How to Calculate Peptide Molarity: 10 Powerful Steps for Accurate Research Success

How to Calculate Peptide Molarity: The Complete Researcher’s Guide
Calculating peptide molarity is one of the most important skills every peptide researcher should master. Whether you’re working with BPC-157, TB-500, Semaglutide, Tirzepatide, Retatrutide, Kisspeptin, Gonadorelin, or any other research peptide, accurate molarity calculations are essential for producing reliable, reproducible laboratory results.
Unfortunately, many researchers unknowingly make concentration errors before their experiments even begin. These mistakes can lead to inconsistent assay results, inaccurate dose-response curves, wasted research materials, and weeks or even months of unnecessary troubleshooting.
At PeptideAminoNation.com, we’ve spent more than two decades supporting peptide researchers around the world. One lesson has remained remarkably consistent throughout the years:
Most peptide concentration errors are not caused by difficult mathematics—they’re caused by misunderstanding what is actually inside the peptide vial.
This guide explains everything researchers need to know about calculating peptide molarity correctly, avoiding costly mistakes, understanding Net Peptide Content (NPC), interpreting Certificates of Analysis (CoAs), and applying laboratory best practices that improve experimental accuracy.
Whether you’re a beginner entering peptide research or an experienced laboratory professional looking to refine your workflow, this guide will help you calculate peptide molarity with confidence.
Research Use Only: The information in this article is provided strictly for laboratory research and educational purposes. Products supplied by PeptideAminoNation.com are intended for research use only and are not intended for human or veterinary use.

Table of Contents
1. What Is Peptide Molarity?
2. Why Accurate Peptide Molarity Matters
3. Understanding the Molarity Formula
4. Gross Weight vs Net Peptide Content (NPC)
5. Why Most Researchers Calculate Peptide Molarity Incorrectly
6. Step-by-Step Guide to Calculate Peptide Molarity
7. Laboratory Case Study: The Exenatide Calculation Error
8. Worked Examples Using Popular Research Peptides
9. Professional Laboratory Best Practices
10. Frequently Asked Questions
11. Final Thoughts
What Is Peptide Molarity?
https://pubmed.ncbi.nlm.nih.gov/
How to Calculate Peptide Molarity begins with understanding what molarity actually represents.
Molarity describes the number of moles of peptide dissolved in a specific volume of solution. Rather than simply knowing how many milligrams of peptide were added to a tube, molarity tells researchers the actual molecular concentration available for experimental interaction.
This distinction is extremely important because biological systems respond to the number of peptide molecules, not simply their weight.
Two peptides may each weigh 5 mg, yet produce dramatically different molar concentrations because their molecular weights differ significantly.
For this reason, researchers performing receptor binding assays, enzyme studies, cell culture experiments, pharmacological investigations, or biochemical analyses almost always express peptide concentrations in units such as:
• Molar (M)
• Millimolar (mM)
• Micromolar (µM)
• Nanomolar (nM)
Using molarity instead of mass allows experiments to be standardized and reproduced across different laboratories worldwide.
Why Accurate Peptide Molarity Matters
Many researchers assume concentration calculations are routine paperwork.
In reality, peptide molarity is one of the most critical variables in any peptide experiment.
An incorrectly prepared stock solution affects every dilution prepared afterward.
That means one small calculation mistake can compromise:
• Receptor binding studies
• Cell signaling assays
• Dose-response experiments
• IC50 determination
• EC50 determination
• Protein interaction studies
• Stability testing
• Quality control validation
Because every subsequent dilution originates from the original stock solution, even a relatively small error compounds throughout the entire experiment.
In our experience supporting peptide researchers since 2003, concentration errors account for a significant proportion of technical support requests received after researchers observe unexpected laboratory results.
Most researchers initially suspect peptide degradation, poor synthesis quality, contaminated buffers, faulty instrumentation, or experimental technique.
Surprisingly, the root cause is often much simpler.
The original peptide molarity calculation was incorrect.
Why Learning How to Calculate Peptide Molarity Correctly Saves Months of Research
Researchers invest enormous amounts of time into designing experiments.
Cell cultures require careful maintenance.
Assays consume valuable reagents.
Custom peptides often require significant investment.
When peptide molarity is calculated incorrectly, every downstream result becomes questionable.
Instead of publishing reliable data, laboratories may spend weeks repeating experiments while searching for problems that don’t actually exist.
Learning how to calculate peptide molarity correctly from the beginning prevents these costly setbacks.
It also improves:
• Experimental reproducibility
• Laboratory efficiency
• Data reliability
• Resource management
• Scientific confidence
Understanding the Standard Peptide Molarity Formula
Every researcher should understand the basic molarity equation before relying on spreadsheets or online calculators.
The standard equation is:
Molarity (M) = Number of Moles ÷ Volume (Liters)
Since peptides are usually measured in milligrams instead of moles, researchers first convert peptide mass into moles using molecular weight.
This produces the working laboratory equation:
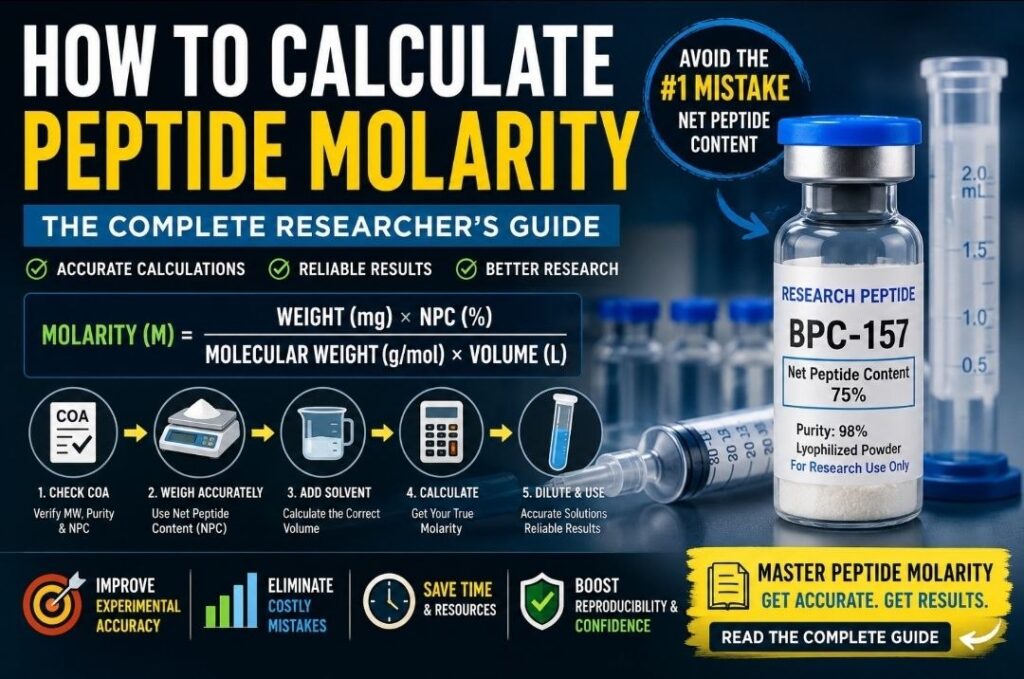
Molarity = Mass of Peptide ÷ (Molecular Weight × Volume)
Where:
Mass
The actual amount of peptide present.
Molecular Weight
The molecular weight listed on the Certificate of Analysis.
Volume
The final solution volume after dissolution.
Although this formula appears simple, its accuracy depends entirely on using the correct peptide mass.
This is exactly where many laboratories unknowingly introduce significant calculation errors.
The Biggest Mistake Researchers Make When Calculating Peptide Molarity
After supporting thousands of researchers over more than twenty years, one mistake appears more frequently than every other calculation error combined.
Researchers assume that the weight printed on the vial represents the actual peptide content.
In many situations, this assumption is incorrect.
Lyophilized peptide powder contains much more than peptide alone.
It commonly includes:
• Residual moisture
• Counterions
• Trifluoroacetate (TFA)
• Acetate salts
• Hydrochloride salts
• Other residual synthesis components
These materials contribute to the total powder weight but are not peptide molecules.
Ignoring this fact causes peptide molarity calculations to become inaccurate before any buffer is even added.
Gross Peptide Weight vs Net Peptide Content (NPC)
Understanding this difference is one of the most valuable skills a peptide researcher can develop.
Gross Peptide Weight
Gross weight refers to the total material inside the vial.
This includes:
• Peptide
• Moisture
• Counterions
• Residual salts
It is the number physically measured on a laboratory balance.
Peptide Purity
Purity tells researchers how much of the peptide fraction possesses the correct amino acid sequence.
For example:
A peptide with 98% purity means 98% of the peptide molecules have the desired sequence.
However, purity does not indicate how much of the powder consists of peptide versus moisture or salts.
Many researchers mistakenly confuse purity with peptide quantity.
These are completely different measurements.
Net Peptide Content (NPC)
Net Peptide Content represents the percentage of the total powder weight that is genuine peptide.
This value usually ranges between approximately 60% and 90%, depending on:
• Amino acid sequence
• Counterion content
• Moisture content
• Manufacturing process
• Purification method
NPC is the value researchers should use when determining the actual peptide mass for molarity calculations.
Ignoring NPC frequently produces concentration errors of 20–40%, which can significantly affect quantitative research results.
How to Calculate Peptide Molarity: Step-by-Step Laboratory Guide
Now that you understand why How to Calculate Peptide Molarity depends on more than simply reading the vial label, let’s walk through the professional workflow used by experienced peptide researchers.
Following these steps will help you prepare accurate stock solutions while minimizing calculation errors that can affect downstream experiments.
Step 1: Verify the Molecular Weight
The first step in How to Calculate Peptide Molarity is identifying the peptide’s molecular weight (MW).
Every peptide has its own unique molecular weight because each amino acid contributes to the overall molecular mass.
For example:
| Peptide | Approximate Molecular Weight |
| BPC-157 | 1419.5 g/mol |
| TB-500 | 4963.5 g/mol |
| Semaglutide | 4113.6 g/mol |
| Tirzepatide | 4813.5 g/mol |
| Retatrutide | 4731 g/mol |
| Exenatide | 4186.6 g/mol |
| Kisspeptin-10 | 1302.6 g/mol |
| Gonadorelin | 1182.3 g/mol |
Always obtain the molecular weight from the manufacturer’s Certificate of Analysis (CoA) or verified product documentation.
Never estimate molecular weight based on peptide length alone.
Step 2: Check the Net Peptide Content (NPC)
This is the step that separates experienced peptide researchers from beginners.
Before calculating molarity, locate the Net Peptide Content (NPC) on the Certificate of Analysis.
Remember:
• Gross Weight = Total powder inside the vial
• Net Peptide Content = Actual peptide available
• Purity = Correct peptide sequence
These three values serve different purposes.
Only the Net Peptide Content should be used to determine the true peptide mass for molarity calculations unless your supplier specifically states that the vial contains a certified net peptide fill.
Expert Tip
Many researchers assume that a peptide labeled “5 mg” contains exactly 5 mg of peptide.
In reality, the powder may contain residual moisture and counterions from peptide synthesis. Always verify whether the stated amount is gross powder weight or net peptide weight.
Step 3: Calculate the Actual Peptide Mass
Once the NPC is known, calculate the true peptide mass.
Formula
Actual Peptide Mass = Gross Weight × Net Peptide Content
Example:
Gross Weight = 10 mg
NPC = 75%
Actual Peptide Mass
= 10 × 0.75
= 7.5 mg
Although the vial physically contains 10 mg of powder, only 7.5 mg represents peptide molecules.
This corrected value should be used in the molarity equation.
Step 4: Apply the Peptide Molarity Formula
Once the actual peptide mass is known, calculate molarity using the corrected value.
Molarity = Mass ÷ (Molecular Weight × Volume)
Where:
• Mass = Actual peptide mass
• Molecular Weight = g/mol
• Volume = Final solution volume
When performed correctly, this equation provides the true molecular concentration of the peptide solution.
Worked Example: Gross Weight vs Net Peptide Content
Let’s compare two researchers preparing the same peptide solution.
Laboratory Data
Gross Powder Weight
1 mg
Net Peptide Content
75%
Molecular Weight
1000 g/mol
Final Volume
1 mL
Incorrect Calculation
The researcher assumes the entire 1 mg consists of peptide.
Mass Used
1 mg
Calculated Concentration
1.0 mM
Correct Calculation
Actual Peptide Mass
1 mg × 0.75
= 0.75 mg
Correct Concentration
0.75 mM
The Result
The incorrect calculation overestimates peptide concentration by 25%.
That error continues into every dilution prepared afterward.
A single oversight during stock preparation can therefore influence every experimental result generated from that solution.
Common Mistake: Confusing Purity with Peptide Content
This misunderstanding appears repeatedly in technical support requests.
Imagine a Certificate of Analysis reports:
• Purity: 98%
• Net Peptide Content: 74%
Many researchers incorrectly use 98% in their concentration calculations.
That is not correct.
Purity describes the proportion of peptide molecules that have the correct amino acid sequence.
Net Peptide Content describes how much of the powder is actually peptide.
For concentration calculations, Net Peptide Content is the relevant value.
Failure to distinguish between these two measurements can produce substantial concentration errors.
Professional Laboratory Workflow for Accurate Peptide Molarity
Over the past two decades of supporting peptide researchers, we’ve found that laboratories achieving the most consistent results follow a standardized preparation workflow.
Rather than rushing directly into reconstitution, they verify each critical parameter before opening the peptide vial.
A recommended workflow includes:
1. Verify molecular weight.
2. Review the Certificate of Analysis.
3. Confirm Net Peptide Content.
4. Confirm peptide purity.
5. Calculate the desired stock concentration.
6. Select the appropriate solvent.
7. Calculate the required final volume.
8. Prepare the stock solution.
9. Label the vial clearly.
10. Record all calculations in the laboratory notebook or electronic lab notebook (ELN).
Standardizing this workflow dramatically reduces preparation errors while improving reproducibility between researchers.
Expert Laboratory Tips for More Accurate Peptide Calculations
Researchers often focus exclusively on mathematical formulas.
Experienced laboratories know that precision depends just as much on good laboratory habits.
Record Every Calculation
Maintain complete records for every prepared stock solution.
This allows experiments to be repeated months later using identical preparation methods.
Double-Check Every Unit
Many concentration errors occur because researchers accidentally confuse:
• mg and µg
• mL and µL
• mmol and µmol
A single misplaced decimal point can alter concentration by several hundred-fold.
Use Properly Calibrated Pipettes
Even a perfect molarity calculation becomes meaningless if liquid volumes are inaccurate.
Routine pipette calibration should be part of every laboratory quality assurance program.
Avoid Excessive Rounding
Round values only after completing the calculation.
Premature rounding introduces cumulative errors during serial dilutions.
Don’t Ignore Counterions
Residual acetate, hydrochloride, or trifluoroacetate counterions contribute to gross powder weight.
Ignoring these additional components often explains why calculated concentrations fail to match expected experimental responses.
Researcher’s Checklist Before Preparing Any Peptide Solution
Before adding buffer to a peptide vial, ask yourself the following questions:
✔ Have I confirmed the molecular weight?
✔ Did I review the Certificate of Analysis?
✔ Am I using Net Peptide Content rather than purity?
✔ Have I calculated the actual peptide mass?
✔ Have I selected the correct solvent?
✔ Have I confirmed my desired stock concentration?
✔ Have I checked every unit twice?
✔ Have I documented my calculations?
Taking less than five minutes to complete this checklist can prevent weeks of unnecessary troubleshooting later.
Why Verified Spreadsheets Outperform Manual Calculations
Researchers often ask which method produces the most reliable peptide molarity calculations.
Based on years of laboratory experience, we recommend a hybrid workflow.
Use a verified spreadsheet as your primary calculation tool and an online peptide calculator as a secondary validation step.
Lock calculation cells within Excel or Google Sheets to prevent accidental formula changes.
This approach combines speed, consistency, traceability, and accuracy while reducing transcription errors.
Manual calculations remain valuable for understanding the underlying chemistry, but routine laboratory workflows benefit greatly from standardized digital templates that can be saved alongside experimental records.
Part 3: Real Laboratory Case Study and Worked Peptide Molarity Examples
Now that we’ve covered the fundamentals of How to Calculate Peptide Molarity, let’s examine a real-world laboratory scenario that demonstrates how a seemingly small calculation error can affect an entire research project.
Laboratory Case Study: The Exenatide Calculation Error
The Project
An academic research group was investigating the activity of
Exenatide on cultured cell lines.
The peptide had a molecular weight of approximately 4,186.6 g/mol
The Mistake
The laboratory received a vial labeled 10 mg of lyophilized Exenatide.
The researcher assumed the entire 10 mg represented pure peptide and prepared what was intended to be a 1 mM stock solution.
However, the Certificate of Analysis listed:
| Gross Powder Weight | 10 mg |
| Net Powder Content | 72% |
| Actual Peptide Mass | 7.2 mg |
The Consequence
The prepared stock was not 1.0 mM
It was actually 0.72 mM.
This created a 28% concentration error.
Every subsequent dilution used in the dose-response assay was also 28% lower than expected.
The Solution
After reviewing the CoA, the research team recalculated the stock using the actual peptide mass instead of the gross powder weight.
When the assay was repeated, the EC₅₀ values aligned with published literature and the project moved forward successfully.
Laboratory Lesson
The peptide was not defective.
The calculation was.
Worked Example #1: How to Calculate Peptide Molarity for BPC-157
Input Data
| Parameter | Value |
| Gross Powder Weight | 5 mg |
| Net Peptide Content | 80% |
| Molecular Weight | 1419.5 g/mol |
| Final Volume | 2 mL |
Step 1: Determine actual peptide mass
5 mg × 0.80 = 4.0 mg
Actual peptide mass = 4.0 mg
Step 2: Calculate molarity
mg ÷ (1419.5 × 2 mL)
Calculated concentration ≈ 1.41 mM
Correct BPC-157 stock 1.41
concentration. mM
Worked Example #2: How to Calculate Peptide Molarity for TB-500
Input Data
| Parameter | Value |
| Gross Powder Weight | 5 mg |
| Net Peptide Content | 74% |
| Molecular weight | 4113.6 g/mol |
| Final Volume | 1 mL |
Step 1: Actual peptide mass
10 × 0.78 = 7.8 mg
Actual peptide mass = 7.8 mg
Step 2: Molarity
7.8 ÷ (4963.5 × 2
Calculated concentration. ≈ 0.79 mM
Correct TB-500 stock 0.79
concentration. mM
Worked Example #3: How to Calculate Peptide Molarity for Semaglutide
Input Data
| Parameter | Value |
| Gross Powder Weight | 10 mg |
| Net Peptide Content | 76% |
| Molecular Weight | 4813.5 g/mol |
| Final Volume | 2 mL |
Step 1: Actual peptide mass
5 × 0.74 = 3.7 mg
Actual peptide mass = 3.7 mg
Step 2: Molarity
3.7 ÷ (4113.6 × 1)
Calculated concentration ≈ 0.90 mM
concentration mM
Expert Insigh
Notice how Semaglutide and Tirzepatide produce different molar concentrations even when similar milligram amounts are used.
This is why researchers should never compare peptides by mass alone. Molecular weight fundamentally changes the number of peptide molecules present in solution.
Quick Reference Table for Popular Research Peptides
| Peptide | Approximate MW (g/mol) |
| BPC-157 | 1419.5 |
| TB-500 | 4963.5 |
| Semaglutide | 4113.6 |
| Tirzepatide | 4813.5 |
| Retatrutide | 4731 |
| Kisspeptin-10 | 1302.6 |
| Gonadorelin | 1182.3 |
| Exenatide | 4186.6 |
Laboratory Best Practice: Save Your Calculation
What experienced labs do
Experienced laboratories save every peptide molarity calculation in their electronic lab notebook (ELN).
A complete record should include:
Peptide name
Batch or lot number
Molecular weight
Net Peptide Content
Gross powder weigh
Calculated peptide mass
Final volume
Date of preparation
Researcher initials
This practice makes troubleshooting dramatically easier if experimental results need to be reviewed months later
Key Takeaway
The math is rarely the problem.
The critical step in How to Calculate Peptide Molarity is using the actual peptide mass (NPC-adjusted mass) rather than the gross powder weight.
Advanced Guide: How to Calculate Peptide Molarity Like a Professional Researcher
Once you’ve mastered the basics of How to Calculate Peptide Molarity, the next step is learning the advanced techniques used by experienced laboratories. These methods improve accuracy, reduce experimental variability, and help ensure reproducible research results.
How to Calculate Peptide Molarity for Serial Dilutions
Preparing a stock solution is only the beginning. Most laboratory experiments require one or more serial dilutions to achieve the desired working concentration.
The most widely used equation for serial dilutions is:
C₁V₁ = C₂V₂
Where:
• C₁ = Initial stock concentration
• V₁ = Volume of stock solution required
• C₂ = Desired final concentration
• V₂ = Final solution volume
Example
Suppose you have:
• Stock concentration = 5 mM
• Desired concentration = 10 µM
• Final volume = 1 mL
Using the equation:
V₁ = (C₂ × V₂) ÷ C₁
The calculation shows that only a very small volume of stock is needed.
Laboratory Best Practice
If the calculated transfer volume is less than 2 µL, avoid pipetting directly from the stock solution. Instead, prepare an intermediate dilution first. Extremely small pipetting volumes increase measurement uncertainty and can reduce experimental reproducibility.
The Dilution Factor Shortcut
Experienced researchers often calculate the dilution factor before preparing solutions.
Dilution Factor (DF) = Stock Concentration ÷ Desired Concentration
Using the previous example:
• Stock = 5,000 µM
• Desired = 10 µM
DF = 500
This means the stock solution must be diluted 500-fold.
Using the dilution factor first allows researchers to quickly determine whether a single-step dilution is practical or whether intermediate dilutions are necessary.
How to Calculate Peptide Molarity When Working with Hydrophobic Peptides
Accurate molarity calculations alone do not guarantee a successful peptide solution.
Some peptides dissolve readily in water, while others remain cloudy or form visible precipitates even when the mathematical calculations are correct.
One useful guideline is the 1-in-3 Rule.
The 1-in-3 Rule
Estimate the proportion of charged (hydrophilic) amino acids within the peptide sequence.
If fewer than one-third of the amino acids are hydrophilic, the peptide is more likely to be hydrophobic and may require an organic co-solvent such as DMSO or DMF before dilution into an aqueous buffer.
Ignoring peptide solubility can result in incomplete dissolution, making the actual concentration lower than the calculated concentration.
Common Mistake
Researchers sometimes assume that cloudy solutions are simply “slow to dissolve.”
In many cases, the peptide has precipitated, meaning the solution is no longer homogeneous. Pipetting from such a solution can produce inconsistent concentrations between samples.
How pH and the Isoelectric Point Affect Peptide Molarity
Another important factor in How to Calculate Peptide Molarity is understanding peptide solubility at different pH values.
Every peptide has an isoelectric point (pI)—the pH at which the peptide carries no net electrical charge.
At or near its pI, peptide solubility is often at its lowest.
This increases the likelihood of precipitation, even if the calculated molarity is correct.
Laboratory Best Practice
Avoid preparing peptide solutions in buffers with a pH close to the peptide’s isoelectric point whenever possible.
Instead:
• Review the peptide sequence.
• Estimate the pI.
• Select a buffer with an appropriate pH.
• Confirm that the peptide has fully dissolved before beginning experiments.
Proper buffer selection helps preserve both solution stability and concentration accuracy.
Using the Beer-Lambert Law to Verify Peptide Concentration
Occasionally, researchers need to verify peptide concentration experimentally rather than relying solely on calculations.
This is especially useful when:
• The peptide has absorbed atmospheric moisture.
• The powder has been stored for a long period.
• Accurate weighing is difficult.
• Independent concentration verification is required.
The Beer-Lambert Law provides a method for estimating concentration using UV spectroscopy.
A = εcl
Where:
• A = Measured absorbance
• ε = Molar extinction coefficient
• c = Concentration
• l = Path length of the cuvette
For peptides containing aromatic amino acids such as tryptophan or tyrosine, absorbance is commonly measured at 280 nm.
For peptides lacking these residues, measurements at 205 nm are often more appropriate because the peptide backbone contributes to absorbance at this wavelength.
Spreadsheet vs. Online Calculator vs. Manual Calculation
Researchers often ask which approach is best for calculating peptide molarity.
Based on our experience supporting peptide researchers, each method has advantages.
| Method | Advantages | Limitations |
| Manual Calculation | Excellent for learning the underlying principles | Higher risk of calculation and transcription errors |
| Online calculation | Fast and convenient for quick checks | Requires internet access and manual data entry |
| Verified Spreadsheet | Fast, repeatable, traceable, and suitable for batch processing | Initial setup requires validation |
Our Recommendation
For routine laboratory work, use a verified spreadsheet as your primary calculation tool and a reputable online calculator to confirm important results.
Lock spreadsheet formulas after validation to reduce the risk of accidental edits.
Common Errors That Affect Peptide Molarity
Even experienced researchers occasionally make avoidable mistakes.
Watch for the following:
• Using gross powder weight instead of Net Peptide Content.
• Confusing peptide purity with peptide content.
• Entering the wrong molecular weight.
• Mixing milliliters and microliters.
• Mixing milligrams and micrograms.
• Rounding intermediate calculations too early.
• Preparing serial dilutions without verifying stock concentration.
• Using uncalibrated pipettes.
• Ignoring peptide precipitation after reconstitution.
Recognizing these common issues can significantly improve the accuracy and reproducibility of peptide research.
Professional Research Checklist Before Every Experiment
Before using any peptide solution, confirm the following:
✅ Molecular weight verified.
✅ Certificate of Analysis reviewed.
✅ Net Peptide Content confirmed.
✅ Desired molarity calculated correctly.
✅ Solvent selected appropriately.
✅ Final volume verified.
✅ Peptide completely dissolved.
✅ Calculations recorded.
✅ Stock solution labeled.
✅ Aliquots prepared if long-term storage is required.
Following this checklist consistently helps minimize experimental errors and supports reliable laboratory workflows.
Supporting Accurate Peptide Research
At PeptideAminoNation.com, our goal extends beyond supplying research peptides. We are committed to helping researchers understand peptide chemistry, interpret Certificates of Analysis, calculate concentrations correctly, and apply best laboratory practices.
Our educational resources are designed to help researchers improve experimental accuracy and avoid common preparation errors through practical, science-based guidance.
Frequently Asked Questions About How to Calculate Peptide Molarity
Below are answers to some of the most common questions we receive from researchers. These FAQs are designed to address common concerns while also targeting Google’s “People Also Ask” results.
How do I calculate peptide molarity?
To calculate peptide molarity:
• Verify the peptide’s molecular weight.
• Check the Net Peptide Content (NPC) on the Certificate of Analysis.
• Calculate the actual peptide mass by multiplying the gross weight by the NPC.
• Divide the peptide mass by the molecular weight and the final solution volume.
Using the correct peptide mass rather than the gross powder weight helps produce a more accurate molar concentration.
What is the difference between peptide purity and Net Peptide Content?
Peptide purity indicates the percentage of peptide molecules that have the correct amino acid sequence.
Net Peptide Content indicates how much of the total powder consists of actual peptide after accounting for moisture and residual counterions.
For peptide molarity calculations, Net Peptide Content is generally the value used to determine the actual peptide mass.
Why is my calculated peptide concentration different from my expected concentration?
Several factors can contribute to unexpected peptide concentrations, including:
• Using gross powder weight instead of Net Peptide Content.
• Incorrect molecular weight.
• Incomplete peptide dissolution.
• Pipetting inaccuracies.
• Unit conversion errors.
• Using the wrong final solution volume.
Reviewing each calculation step carefully often helps identify the source of the discrepancy.
Can I calculate peptide molarity without knowing the molecular weight?
No.
The molecular weight is an essential parameter in the molarity equation. Without it, you cannot accurately convert peptide mass into moles.
Always obtain the molecular weight from the Certificate of Analysis or verified product documentation before preparing peptide solutions.
Should I calculate peptide molarity manually or use an online calculator?
Manual calculations are useful for learning the underlying principles of peptide chemistry.
For routine laboratory work, we recommend using a validated spreadsheet together with a reputable online calculator as a secondary verification tool. This approach combines speed, consistency, and traceability while reducing the likelihood of calculation errors.
Why is Net Peptide Content so important?
Net Peptide Content represents the proportion of the powder that is actual peptide.
Because lyophilized peptide powders may also contain moisture and counterions, ignoring Net Peptide Content can lead to concentration errors of 20–40%, depending on the peptide and manufacturing process.
Can peptide precipitation affect molarity?
Yes.
If a peptide precipitates after reconstitution, the solution may no longer be homogeneous. This means the concentration of peptide in each pipetted sample may differ from the calculated value.
Selecting an appropriate solvent, adjusting buffer pH when necessary, and ensuring complete dissolution before use all help maintain concentration accuracy.
Final Thoughts
Understanding How to Calculate Peptide Molarity is far more than an academic exercise. It is one of the most important skills for producing reliable, reproducible peptide research.
Although the mathematical formula is straightforward, the accuracy of the final concentration depends on careful attention to details such as molecular weight, Net Peptide Content, solution volume, solvent selection, and proper laboratory technique.
Throughout this guide, we’ve shown that the most common calculation errors are often avoidable. By reviewing the Certificate of Analysis, using the correct peptide mass, maintaining accurate records, and following standardized laboratory workflows, researchers can improve the quality and consistency of their experimental results.
At PeptideAminoNation.com, we believe that providing high-quality research peptides is only part of supporting the scientific community. We are equally committed to sharing practical educational resources that help researchers understand peptide chemistry, interpret Certificates of Analysis, calculate peptide molarity accurately, and apply best laboratory practices with confidence.
Whether you’re preparing your first peptide stock solution or managing complex research projects involving multiple peptides, building a strong foundation in peptide molarity calculations will help you save time, reduce experimental variability, and generate more dependable data.
We invite you to explore the educational resources available on PeptideAminoNation.com, where you’ll find detailed guides on peptide reconstitution, Certificate of Analysis interpretation, peptide storage, purity, Net Peptide Content, and many other topics designed to support successful laboratory researc
Read Related Topics
To strengthen your understanding of peptide preparation and laboratory best practices, consider reading these related articles on PeptideAminoNation.com:
– Understanding Peptide Purity Percentages on Certificates of Analysis
– What Is Net Peptide Content (NPC)?
• How to Read a Peptide Certificate of Analysis
• Common Peptide Reconstitution Mistakes and Their Solutions
• Understanding Peptide Solubility
• The Role of pH in Peptide Solubility
• Understanding Peptide Hydrophobicity
• How to Store Lyophilized Peptides Properly
